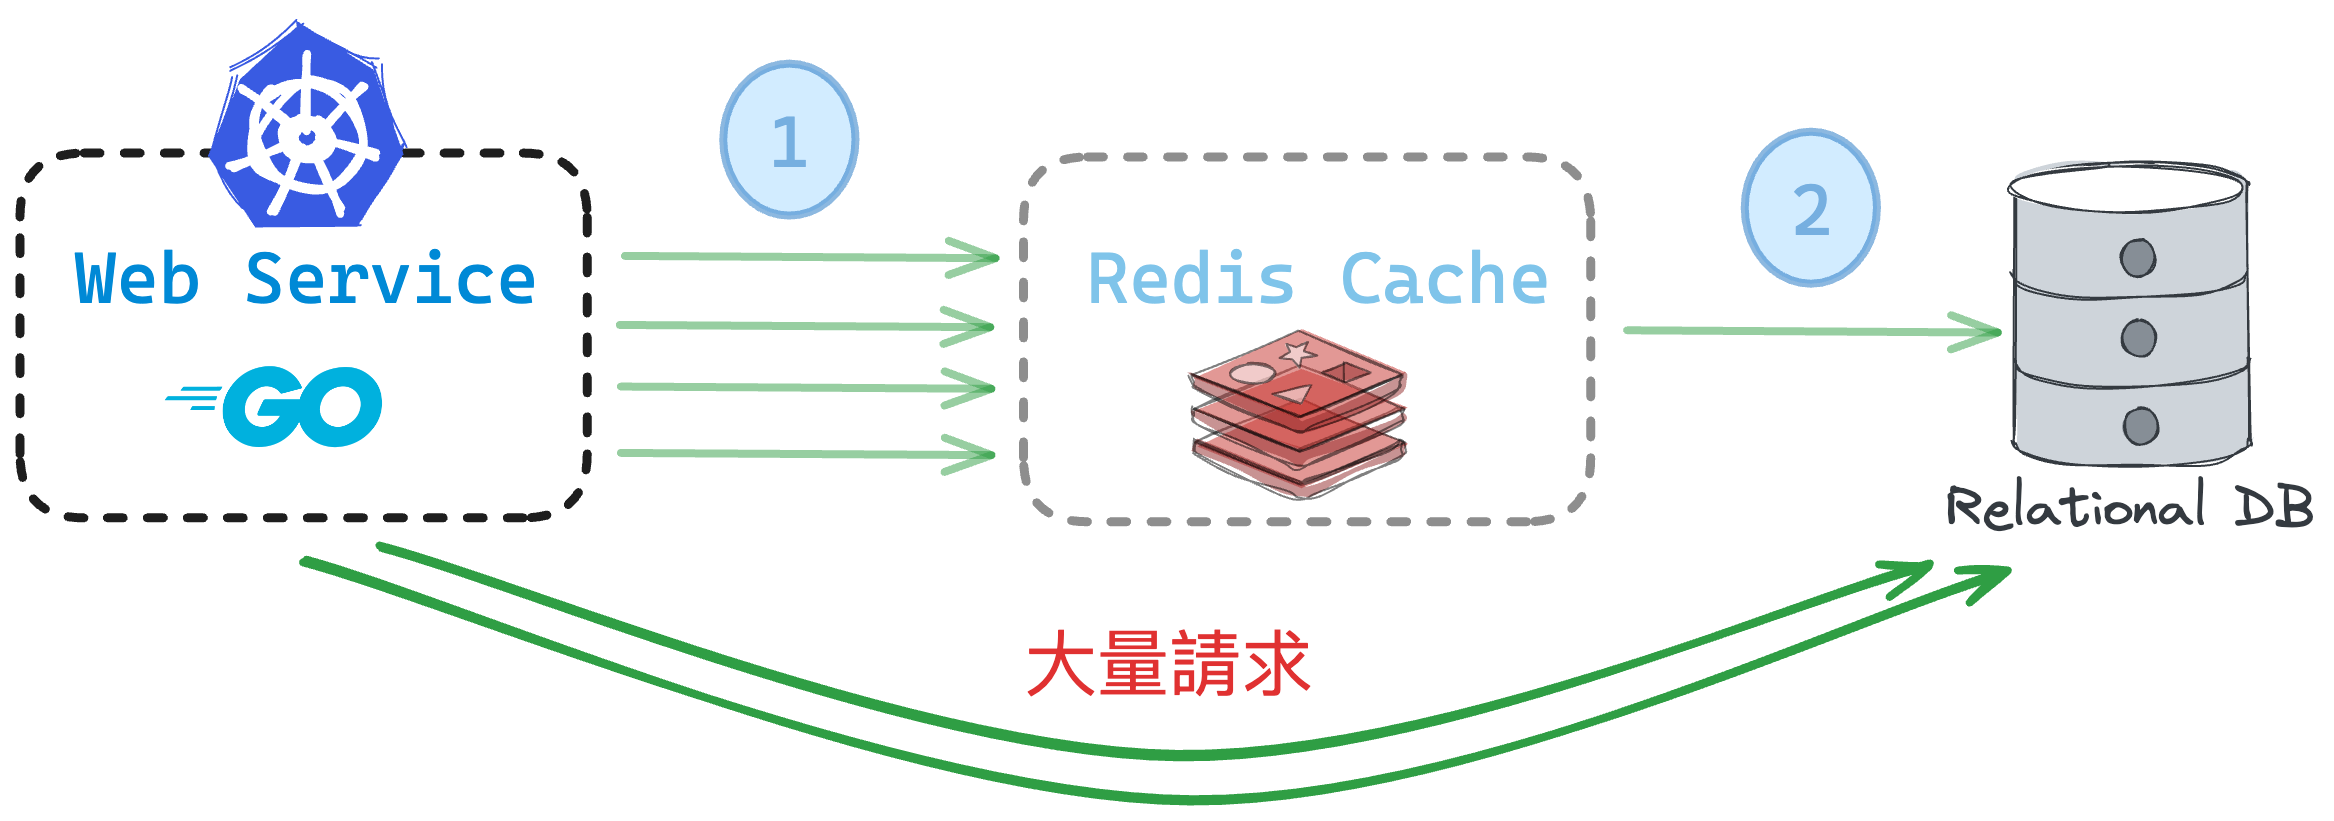
Aug 26th, 2010 by appleboy 參觀者:668Views 機器人:26Views
推到 Twitter!
推到 Plurk!
推到 Facebook!
好久沒寫相關 CodeIgniter 文章,針對於剛入門 CI 的新手們,此篇教學如何使用 jQuery AJAX 搭配 CI 來驗證使用者帳號及相關資訊,本篇教學帶您如何在 CI 中發出 AJAX request 給伺服器端。
請先在網頁 header 自行 include jQuery 檔案,或者可以使用 Google AJAX CDN 方式來讀取,將底下程式碼放到 之前:
$(document).ready(function() {
/* 先停止讀取狀態 */
$('#Loading').hide();
/* 填寫好 email 欄位,按下 Tab 會進行讀取 */
$('#email').blur(function(){
/* 讀取 email 欄位 */
var a = $("#email").val();
/* email 正規語法 */
var filter = /^[a-zA-Z0-9]+[a-zA-Z0-9_.-]+[a-zA-Z0-9_-]+@[a-zA-Z0-9]+[a-zA-Z0-9.-]+[a-zA-Z0-9]+.[a-z]{2,4}$/;
/* 簡易驗證 email */
if(filter.test(a)){
/* 讀取狀態 */
$('#Loading').show();
/* AJAX 比對資料庫 */
$.post("<?php echo base_url()?>controller_name/check_email_availablity", {
email: $('#email').val()
}, function(response){
/* 驗證後讀取 reponse 狀態 */
$('#Loading').hide();
setTimeout("finishAjax('Loading', '"+escape(response)+"')", 400);
});
return false;
}
});
Continue Reading »
Posted in AJAX, CodeIgniter, jQuery | 2 Comments »
Aug 25th, 2010 by appleboy 參觀者:554Views 機器人:38Views
推到 Twitter!
推到 Plurk!
推到 Facebook!
Update 2010.08.28: Pspad 轉換既有 Tabs to Spaces by bootleq

為了統一 Windows 跟 Linux 底下的編輯器在使用 Tab 功能相同,所以調整了 Vim 及 Pspad(我常用編輯器)的設定,底下是針對 Vim 及 Pspad 的解決方法。首先當大家使用 Vim 編輯器撰寫程式,常常會使用 Tab 來縮排程式碼,我們可以使用 expandtab 來插入空白鍵(Space)取代 Tab:
控制插入 Tab 時所需要的空白鍵(Tab)字元數,例如用4個空白鍵取代 Tab:
在我們設定完 expandtab 之後,所有的 Tab 鍵將會被 Space 所取代,但是原本在檔案文件中的 Tab 將不會改變,為了取代原有的 Tab 到新的設定,我們必須鍵入:
針對程式縮排所需要的 Space 個數,我們可以使用 shiftwidth 選項
底下舉個例子:
- 將文件中 Tab 取代成 Space
- 所有 Tab 用4個 Space 取代
:set tabstop=4
:set shiftwidth=4
:set expandtab
Pspad 設定
Settings -> Programing Settings -> Editor (Part 2)
設定:
Tab Width:4
Indent Width:4
請勿勾選 Real Tab
如果要把既有的 Tab 轉換成 Space,可以使用:
編輯→特殊轉換→將 Tab 轉成空白
Edit->Special conversion->Convert Tabs to Spaces

針對 Makefile 需要使用 Tab,我們必須在 .vimrc 裡面在加入底下:
autocmd FileType make setlocal noexpandtab
Ref:
Converting tabs to spaces
Posted in blog | 1 Comment »
Aug 23rd, 2010 by appleboy 參觀者:822Views 機器人:36Views
推到 Twitter!
推到 Plurk!
推到 Facebook!

今年在 COSCUP 大會上最主流的議題就是 Html5,今天看到一個網站 HTML5 Boilerplate,這網站提一個全新 html 5 模板,自從離開 Dreamweaver 樣板軟體,利用 Pspad 手動撰寫 html,此網站就發揮非常大的用處,提供全新 html,CSS 以及 javascript,支援了底下很多功能:
- 跨瀏覽器 (IE6…)
- 支援多種 html5 Tag
- Compress 和 cache html 檔案
- CSS IE6 , IE7 Hack
- IE6 Png Fix (連這個都幫忙解決了)
- 支援 CDN jQuery,避免在 local 端沒讀取到檔案
你還可以根據自己需要的功能做添加或者是減少,CSS reset、跨瀏覽器 CSS、robots.txt、Apache .htaccess cache 壓縮也有支援,如果不需要的功能,也可以參考看看,對於初學者也是非常好的學習例子。
Posted in CSS, apache, jQuery, javascript | No Comments »
Aug 20th, 2010 by appleboy 參觀者:836Views 機器人:50Views
推到 Twitter!
推到 Plurk!
推到 Facebook!
這次來介紹一下 git reset 的用法,為什麼會介紹這指令呢?因為今天想要看專案狀態,用 git status 觀看,發現被我玩爛了,所以出現了底下錯誤訊息:
$ git status
error: bad index file sha1 signature
fatal: index file corrupt
解決此問題非常簡單,要先刪除 index 檔案,請先砍掉 .git/index,恢復此 index 請用
這行指令相當於 git reset –mixed HEAD,或者是可以用 git read-tree 來取代 git reset,當然 git reset 不只是有這功能而已,假如您已經建立了 commit 訊息,也可以將此訊息拿掉,重新在 commit,或者是您修改過的檔案在暫存區,git 也可以幫您恢復到未暫存,或者是不想要這次的修改,也可以恢復到未修改的檔案喔。
取消已經暫存的檔案
假如我們有兩個檔案需要 commit,但是不小心按到 git add * 全部加入到暫存區,那該怎麼恢復呢?
# On branch master
# Changes to be committed:
# (use "git reset HEAD <file>..." to unstage)
#
# modified: Makefile
# modified: user/easy_setup/easysetup.h
#
上面是以經在暫存區裡面等待被 commit 檔案(Changes to be committed),大家可以看到括號裡面有提示如何拿掉 (use “git reset HEAD …” to unstage),所以我們下:
git reset HEAD user/easy_setup/easysetup.h
之後會看到 『user/easy_setup/easysetup.h: locally modified』此訊息,這時候在用 git status 看狀態
# On branch master
# Changes to be committed:
# (use "git reset HEAD </file><file>..." to unstage)
#
# modified: Makefile
#
# Changed but not updated:
# (use "git add </file><file>..." to update what will be committed)
#
# modified: user/easy_setup/easysetup.h
#
Continue Reading »
Posted in Git | No Comments »
Aug 18th, 2010 by appleboy 參觀者:634Views 機器人:46Views
推到 Twitter!
推到 Plurk!
推到 Facebook!
相信大家對 Git 並不陌生,這次在升級 Moztw 的討論區,從 3.0.5 升級到 3.0.7 p1,過程由其他 Moztw 成員升級,我在將最後程式 commit 到 github,因為兩個版本差異性很大,所以有新增多個檔案,commit 過程出現了錯誤訊息:「You have some suspicious patch lines」,這是因為 git 會檢查每行程式碼最後是否有多餘空白或者是 Tab 按鍵,為瞭解決此問題,可以去修改 .git/hooks/pre-commit,將底下程式碼:
if (s/^\+//) {
$lineno++;
chomp;
if (/\s$/) {
bad_line("trailing whitespace", $_);
}
if (/^\s* \t/) {
bad_line("indent SP followed by a TAB", $_);
}
if (/^([<>])\1{6} |^={7}$/) {
bad_line("unresolved merge conflict", $_);
}
}
改成:
if (s/^\+//) {
$lineno++;
chomp;
# if (/\s$/) {
# bad_line("trailing whitespace", $_);
# }
# if (/^\s* \t/) {
# bad_line("indent SP followed by a TAB", $_);
# }
if (/^([<>])\1{6} |^={7}$/) {
bad_line("unresolved merge conflict", $_);
}
}
暫時停止 git 過濾字串,等 commit 完成之後,在將其 unmask 掉。
參考網站:
Git on Windows: 「You have some suspicious patch lines」
Posted in Git | No Comments »
Aug 4th, 2010 by appleboy 參觀者:1,258Views 機器人:48Views
推到 Twitter!
推到 Plurk!
推到 Facebook!
串接函式 strcat
strcat 此函式用來連接兩字串合併成單一字串,直接看底下範例:
/* strcat example */
#include <stdio.h>
#include <string.h>
int main ()
{
char str[80];
strcpy (str,"these ");
strcat (str,"strings ");
strcat (str,"are ");
strcat (str,"concatenated.");
puts (str);
return 0;
}
output:
these strings are concatenated.
看一下 strcat 原始碼:
char *
strcat(char * __restrict s, const char * __restrict append)
{
char *save = s;
for (; *s; ++s);
while ((*s++ = *append++));
return(save);
}
設定指標 save 成 source,再將 s 指標指向最後,接下來根據 append 字串一個一個往後串接,直到碰到 \0 終止 while 迴圈,最後在將指標 *save 回傳即可。
比較函式 strcmp
strcmp 用來比較兩字串是否相同,相同回傳 0,不相同則回傳兩字串 ASCII 相減的值。底下範例:
/* strcmp example */
#include <stdio.h>
#include <string.h>
int main
()
{
char szKey
[] = "apple";
char szInput
[80];
do {
printf ("Guess my favourite fruit? ");
gets
(szInput
);
} while (strcmp
(szKey
,szInput
) != 0);
puts
("Correct answer!");
return 0;
}
來看看 strcmp 原始碼
#include <string.h>
/*
* Compare strings.
*/
int
strcmp(s1, s2)
const char *s1, *s2;
{
while (*s1 == *s2++)
if (*s1++ == 0)
return (0);
return (*(const unsigned char *)s1 - *(const unsigned char *)(s2 - 1));
}
大家可以看到,比對字串會依序比對,直到 s1 最後字元 \0 則會回傳 0 代表比對成功,如果中途有字元比對不同,則會將兩個字元相減回傳。
串接函式 strncat
strncat 用來串接指定多少字元,底下範例:
/* strncat example */
#include <stdio.h>
#include <string.h>
int main
()
{
char str1
[20];
char str2
[20];
strcpy
(str1
,"To be ");
strcpy
(str2
,"or not to be");
strncat
(str1
, str2
, 6);
printf("%s\n", str1
);
return 0;
}
strncat 原始碼
#include <string.h>
/*
* Concatenate src on the end of dst. At most strlen(dst)+n+1 bytes
* are written at dst (at most n+1 bytes being appended). Return dst.
*/
char *
strncat(char * __restrict dst, const char * __restrict src, size_t n)
{
if (n != 0) {
char *d = dst;
const char *s = src;
while (*d != 0)
d++;
do {
if ((*d = *s++) == 0)
break;
d++;
} while (--n != 0);
*d = 0;
}
return (dst);
}
一樣是先將 dst 指標指向最後一個字元+1,再根據需要串接的大小來決定 dst 最後的指標。
比較函式 strncmp
直接看範例,比較字串前兩個字元是否相同,如果相同則印出
/* strncmp example */
#include <stdio.h>
#include <string.h>
int main
()
{
char str
[][5] = { "R2D2" , "C3PO" , "R2A6" };
int n
;
puts
("Looking for R2 astromech droids...");
for (n
=0 ; n
<3 ; n
++)
if (strncmp
(str
[n
],"R2xx",2) == 0)
{
printf ("found %s\n",str
[n
]);
}
return 0;
}
strncmp 原始碼
#include <string.h>
int
strncmp(s1, s2, n)
const char *s1, *s2;
size_t n;
{
if (n == 0)
return (0);
do {
if (*s1 != *s2++)
return (*(const unsigned char *)s1 -
*(const unsigned char *)(s2 - 1));
if (*s1++ == 0)
break;
} while (--n != 0);
return (0);
}
最後參數傳入 0 則會直接回傳 0,依序比對,直到 n =0 的時候跳出比較迴圈,然後回傳 0,代表比對成功。
Posted in C/C++ | No Comments »
Aug 3rd, 2010 by appleboy 參觀者:1,278Views 機器人:52Views
推到 Twitter!
推到 Plurk!
推到 Facebook!
strstr
這次介紹 C 語言常用 string 函式:strstr,主要是針對兩個輸入參數做比對,Parameters 1 是輸入字串,Parameters 2 是找尋字串,strstr 會先將頭一次比對成功的 pointer 回傳,也就是如果要找尋 appleboyappleboy 字串中的 boy,函式會回傳第一次比對成功的 boy pointer,而並非回傳最後一個比對到的,底下是一個參考範例:
/* strstr example */
#include <stdio.h>
#include <string.h>
int main ()
{
char str[] ="This is a simple string";
char * pch;
/* 找尋 simple 字串 */
pch = strstr (str,"simple");
/* 將 simple 換成 sample */
strncpy (pch,"sample",6);
puts (str);
return 0;
}
看一下 Kernel 原始檔案,strstr 函式:
/*
* Find the first occurrence of find in s.
*/
char *
strstr(s, find)
const char *s, *find;
{
char c, sc;
size_t len;
if ((c = *find++) != 0) {
len = strlen(find);
do {
do {
if ((sc = *s++) == 0)
return (NULL);
} while (sc != c);
} while (strncmp(s, find, len) != 0);
s--;
}
return ((char *)s);
}
先將 sc 指定為內容字串,c 指定為找尋字串,利用兩個迴圈開始一一筆對,利用 strncmp 比對字串,在將比對成功的 pointer 回傳,但是回傳之前需要在將 s– 回到前一個指標,這樣就ok了。
strchr
這字串用來找尋第一次比對成功單一字母符號,也是一樣回傳該指標,底下是範例:
/* strchr example */
#include <stdio.h>
#include <string.h>
int main
()
{
char str
[] = "This is a sample string";
char * pch
;
printf ("Looking for the 's' character in \"%s\"...\n",str
);
pch
=strchr
(str
,'s');
while (pch
!=NULL)
{
printf ("found at %d\n",pch
-str
+1);
pch
=strchr
(pch
+1,'s');
}
return 0;
}
上面範例很容易,那底下來看看完整 strchr 程式碼:
char * strchr
(const char *p, int ch)
{
char c;
c = ch;
for (;; ++p) {
if (*p == c)
return ((char *)p);
if (*p == '\0')
return (NULL);
}
/* NOTREACHED */
}
就只能針對單一字母符號做搜尋,跟 strstr 不同的是 strstr 是針對多個字母符號搜尋,很好區別吧 ^^。
Posted in C/C++ | No Comments »
Jul 27th, 2010 by appleboy 參觀者:1,114Views 機器人:84Views
推到 Twitter!
推到 Plurk!
推到 Facebook!
在底層 Linux Kernel 提供了時序(timing)機制,方便驅動程式設計者所使用,核心是依據硬體發出的『計時器中斷』來追蹤時間的流動狀況。我們可以依據 HZ 的值來設計 Delay 機制,讓驅動程式可以每隔固定一段時間啟動或者是發出訊號,也可以利用 Timer 來讓 LED 閃爍變化,在介紹 Timer API 之前,可以先參考 Linux Kernel: 簡介HZ, tick and jiffies 這篇文章,瞭解一些相關名詞,舉例:如果想知道一秒後的 jiffies 時間,可以寫成底下:
#ifdef CONFIG_BMA150_TIMER
#include <linux/timer.h>
#endif
j = jiffies;
/* 一秒之後 */
stamp_1 = j + HZ;
/* 半秒之後 */
stamp_1 = j + HZ/2;
/* 20秒之後 */
stamp_1 = j + 20*HZ;
Timer API 用法
筆記一下自己在寫 BOSCH Sensortec 三軸加速偵測器(BMA150 Sensor) Driver 的時候,遇到底層要回報 input event X,Y,Z 到 Android HAL(Hardware abstraction layer),所以利用 Timer 的機制定時 report 給 Android。
首先宣告:
#ifdef CONFIG_BMA150_TIMER
#include <linux/timer.h>
#endif
/* 定義 timer_list struct */
#ifdef CONFIG_BMA150_TIMER
struct timer_list bma150_report_timer;
#endif
在 Driver 內的 bma150_probe 裡面 call function:
#ifdef CONFIG_BMA150_TIMER
bma150_init_timer();
#endif
撰寫 bma150_init_timer 函式:
#ifdef CONFIG_BMA150_TIMER
static void bma150_init_timer(void)
{
D("BMA150 init_timer start\n");
/* Timer 初始化 */
init_timer(&bma150_report_timer);
/* 定義 timer 所執行之函式 */
bma150_report_timer.function = bma150_report;
/* 定義 timer 傳入函式之 Data */
bma150_report_timer.data = ((unsigned long) 0);
/* 定義 timer Delay 時間 */
bma150_report_timer.expires = jiffies + BMA150_REPORT_DELAY_1;
/* 啟動 Timer*/
add_timer(&bma150_report_timer);
}
#endif
上述 add_timer 執行之後,會在一秒後執行 bma150_report 函式,執行之後就會停止,所以如果要一直產生迴圈,就必須在 bma150_report 裡面繼續加入 add_timer,改寫如下:
static int bma150_report(void)
{
D("appleboy: test timer. \n");
#ifdef CONFIG_BMA150_TIMER
bma150_report_timer.expires = jiffies + BMA150_REPORT_DELAY_2;
add_timer(&bma150_report_timer);
#endif
return 0;
}
我們可以重新定義 expires 時間 jiffies + BMA150_REPORT_DELAY_2,就可以一直循環了,要離開 Timer 可以在最後加入 deltimer(&bma150_report_timer),最後就完成簡易的 Timer 功能。
參考:
add_timer的使用方法
Linux Kernel: 簡介HZ, tick and jiffies
Posted in Driver, Kernel | 1 Comment »
Jul 25th, 2010 by appleboy 參觀者:1,097Views 機器人:108Views
推到 Twitter!
推到 Plurk!
推到 Facebook!
在 Kernel 2.4 或以上版本,在編譯模組完成,要進行 load module 之前,你會發現底下訊息:
# insmod hello-3.o
Warning: loading hello-3.o will taint the kernel: no license
See http://www.tux.org/lkml/#export-tainted for information about tainted modules
很顯然這訊息是要您在 kernel module 裡面加上版權宣告,例如:”GPL”,”GPL v2″…等來宣告您的 module 並非 open source,利用 MODULE_LICENSE() 巨集來宣告程式 License,同樣的,可以用 MODULE_DESCRIPTION() 來描述此模組或者是 Driver 的功用跟簡介,以及用 MODULE_AUTHOR() 來定義此模組作者,這些巨集都可以在 linux/module.h 裡找到,但是這些並非用於 Kernel 本身,如果大家想看範例程式,可以到 drivers/ 資料夾底下觀看每一個 Driver 程式,底下是簡單 hello world 範例:
#include <linux/kernel.h> /* pr_info所需 include 檔案*/
#include <linux/init.h>
#include <linux/module.h> /* 所有 module 巨集需要檔案*/
#include <linux/version.h>
static int __init hello_init(void)
{
pr_info("Hello, world appleboy\n");
pr_info("The process is \"%s\" (pid %i)\n", current->comm, current->pid);
return 0;
}
static void __exit hello_exit(void)
{
printk(KERN_INFO "Goodbye\n");
}
MODULE_DESCRIPTION("Hello World !!");/* 此程式介紹與描述*/
MODULE_AUTHOR("Bo-Yi Wu <appleboy.tw AT gmail.com>");/* 此程式作者*/
MODULE_LICENSE("GPL");/* 程式 License*/
module_init(hello_init);
module_exit(hello_exit);
在 linux/module.h 裡頭,可以找到 MODULE_LICENSE 可定義的 License
/*
* The following license idents are currently accepted as indicating free
* software modules
*
* "GPL" [GNU Public License v2 or later]
* "GPL v2" [GNU Public License v2]
* "GPL and additional rights" [GNU Public License v2 rights and more]
* "Dual BSD/GPL" [GNU Public License v2
* or BSD license choice]
* "Dual MIT/GPL" [GNU Public License v2
* or MIT license choice]
* "Dual MPL/GPL" [GNU Public License v2
* or Mozilla license choice]
*
* The following other idents are available
*
* "Proprietary" [Non free products]
*
* There are dual licensed components, but when running with Linux it is the
* GPL that is relevant so this is a non issue. Similarly LGPL linked with GPL
* is a GPL combined work.
*
* This exists for several reasons
* 1. So modinfo can show license info for users wanting to vet their setup
* is free
* 2. So the community can ignore bug reports including proprietary modules
* 3. So vendors can do likewise based on their own policies
*/
巨集 define:
#define MODULE_LICENSE(_license) MODULE_INFO(license, _license)
/*
* Author(s), use "Name <email>" or just "Name", for multiple
* authors use multiple MODULE_AUTHOR() statements/lines.
*/
#define MODULE_AUTHOR(_author) MODULE_INFO(author, _author)
/* What your module does. */
#define MODULE_DESCRIPTION(_description) MODULE_INFO(description, _description)
Posted in Kernel, blog | No Comments »