Go 語言除了內建強大的測試工具 (go test) 之外,也提供了效能評估的工具 (go tool pprof),整個生態鏈非常完整,這也是我推薦大家使用 Go 語言的最大原因,這篇會介紹如何使用 pprof 來找出效能瓶頸的地方。假設開發者在寫任何邏輯功能時,發現跑出來的速度不是想像的這麼快,或者是在串接服務流程時,整個回覆時間特別久,這時候可以透過 benchmark 先找出原因。
1
| go test -bench=. -benchtime=3s ./lexer/
|
可以看到底下輸出結果
1
2
3
| BenchmarkCreateKeyString1-8 100000000 35.9 ns/op 8 B/op 1 allocs/op
BenchmarkCreateKeyString2-8 85222555 42.4 ns/op 8 B/op 1 allocs/op
BenchmarkCreateKeyString3-8 73403774 48.0 ns/op 8 B/op 1 allocs/op
|
從上面數據可以看到效能結果,開發者可以根據這結果來調教程式碼,改善過後再透過一樣的指令來評估是否有改善成功。我個人通常開一個新的 performance 分支來進行效能調校,調教完成後,再執行上面指令輸出到存文字檔
1
| go test -bench=. -benchtime=3s ./lexer/ > new.txt
|
接著切回去 master 分支,用同樣的指令
1
| go test -bench=. -benchtime=3s ./lexer/ > old.txt
|
接著用 benchstat 來看看是否有改善,改善了多少?
 1
 2
 3
 4
 5
 6
 7
 8
 9
10
11
12
| $ benchstat -alpha 3 a.txt b.txt
name old time/op new time/op delta
Lexer-8 3.43µs ± 0% 2.22µs ± 0% -35.23% (p=1.000 n=1+1)
name old speed new speed delta
Lexer-8 242MB/s ± 0% 373MB/s ± 0% +54.36% (p=1.000 n=1+1)
name old alloc/op new alloc/op delta
Lexer-8 896B ± 0% 896B ± 0% ~ (all equal)
name old allocs/op new allocs/op delta
Lexer-8 1.00 ± 0% 1.00 ± 0% ~ (all equal)
|
教學影片
如果對於課程內容有興趣,可以參考底下課程。
如果需要搭配購買請直接透過 FB 聯絡我,直接匯款(價格再減 100)
效能評估
上面方式來評估效能之外,最主要遇到的問題會是,在一大段程式碼及邏輯中,要找出慢的主因,就不能光是靠上面的方式,因為開發者不會知道整段程式碼到底慢在哪邊,100 行內要找出慢的原因很難,那 1000 行更難,所以需要透過其他方式來處理。這時候就要使用到 pprof 來找出程式碼所有執行的時間,怎麼輸出 CPU 所花的時間,可以透過底下指令:
1
2
3
| go test -bench=. -benchtime=3s \
-cpuprofile cpu.out \
./lexer/
|
產生出 cpu.out 後,就可以使用 go 指令來看看哪邊出問題
可以進到 console 畫面:
1
2
3
4
5
6
| $ go tool pprof cpu.out
Type: cpu
Time: Jun 7, 2020 at 11:26am (CST)
Duration: 6.04s, Total samples = 5.95s (98.56%)
Entering interactive mode (type "help" for commands, "o" for options)
(pprof)
|
接下來使用方式非常簡單,可以使用 top 功能來看數據
 1
 2
 3
 4
 5
 6
 7
 8
 9
10
11
12
13
14
15
| (pprof) top10
Showing nodes accounting for 4850ms, 81.51% of 5950ms total
Dropped 66 nodes (cum <= 29.75ms)
Showing top 10 nodes out of 81
flat flat% sum% cum cum%
1130ms 18.99% 18.99% 3600ms 60.50% LibertyParser/lexer.(*Lexer).NextToken
970ms 16.30% 35.29% 970ms 16.30% LibertyParser/lexer.(*Lexer).readChar
770ms 12.94% 48.24% 770ms 12.94% runtime.kevent
730ms 12.27% 60.50% 730ms 12.27% LibertyParser/lexer.isLetter (inline)
310ms 5.21% 65.71% 1480ms 24.87% LibertyParser/lexer.(*Lexer).readIdentifier
290ms 4.87% 70.59% 290ms 4.87% runtime.madvise
210ms 3.53% 74.12% 210ms 3.53% runtime.pthread_cond_wait
170ms 2.86% 76.97% 170ms 2.86% runtime.memclrNoHeapPointers
140ms 2.35% 79.33% 4200ms 70.59% LibertyParser/lexer.BenchmarkLexer
130ms 2.18% 81.51% 370ms 6.22% LibertyParser/lexer.(*Lexer).readString
|
注意 flat 代表執行該 func 所需要的時間 (不包含內部其他 func 所需要的時間),而 cum 則是包含全部函示的執行時間。接下來就可以看到整個列表需要改善的項目,像是要改善 readChar 就可以直接執行 list readChar
 1
 2
 3
 4
 5
 6
 7
 8
 9
10
11
12
13
14
15
16
17
18
19
20
21
| (pprof) list readChar
Total: 5.95s
ROUTINE ======================== LibertyParser/lexer.(*Lexer).readChar in /Users/appleboy/git/appleboy/LibertyParser/lexer/lexer.go
970ms 970ms (flat, cum) 16.30% of Total
. . 22: l.readChar()
. . 23: return l
. . 24:}
. . 25:
. . 26:func (l *Lexer) readChar() {
260ms 260ms 27: if l.readPosition >= len(l.Data) {
. . 28: // End of input (haven't read anything yet or EOF)
. . 29: // 0 is ASCII code for "NUL" character
. . 30: l.char = 0
. . 31: } else {
620ms 620ms 32: l.char = l.Data[l.readPosition]
. . 33: }
. . 34:
50ms 50ms 35: l.position = l.readPosition
40ms 40ms 36: l.readPosition++
. . 37:}
. . 38:
|
開發者可以清楚看到每一行所需要的執行時間 (flat, cum),這樣就可以知道時間到底慢在哪邊?哪邊需要進行關鍵性
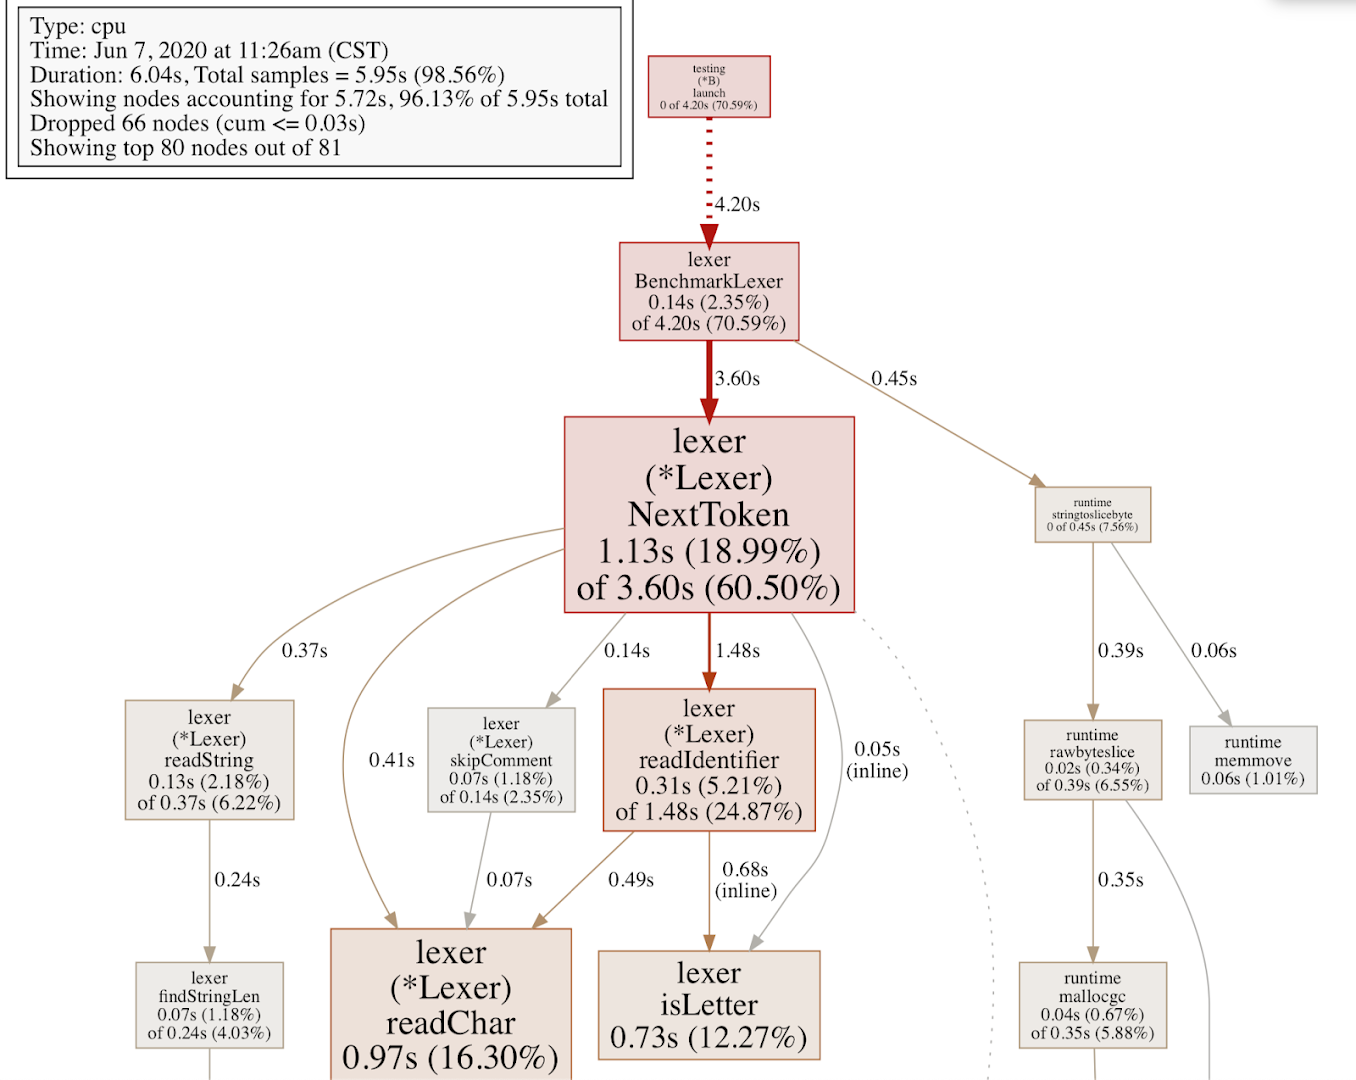
優化。沒有這些數據,開發者就只能自己使用傳統方式 log.Println() 方式來進行除錯。除了上述這些之外,pprof 也提供其他方式來觀看,像是輸出 pdf 之類的,只要在 console 內鍵入 pdf 即可,pdf 內容會有更詳細的圖

除了透過在 console 端操作之外,開發者也可以透過 web 方式來進行 UI 操作,對比 console 來說,看到完整的 pprof 報表,這樣更方便除錯。
1
| go tool pprof -http=:8080 cpu.out
|
自動會開啟 web 顯示,個人覺得相當的方便,從 console 操作轉到 UI 操作,體驗上還是有差別的。
心得
善用 pprof 可以改善蠻多效能上的問題,也可以抓到哪邊的邏輯寫錯,造成跑太多次,導致效能變差,除了寫法上差異之外,最主要還有程式上的邏輯,也許換個方式效能就改善很多。本篇算是 pprof 的初探,希望大家會喜歡。
See also