Why Our Team Migrated from Bitbucket Data Center to Gitea Enterprise

cover

In the software development field, most people are no strangers to Git—the world’s most popular version control system and a foundational tool for modern collaborative development. And when we talk about Git, we can’t help but think of GitHub, the largest and most well-known open-source software platform today.

However, for many private companies or small to mid-sized teams, GitHub may not be an option due to security, cost, deployment strategies, or regulatory requirements. In such cases, what tools can serve as an internal Git repository platform? The most common choices include GitLab and Gitea, which is the focus of this article.

For some teams, Gitea might still be relatively unfamiliar. Simply put, Gitea is a lightweight, self-hosted Git platform written in Go, providing GitHub-like capabilities such as code hosting, permission management, Issues and Pull Requests, and CI/CD. You can find a more comprehensive explanation in the official documentation (Gitea Documentation). It’s cross-platform, easy to deploy, and low-maintenance, which is why it has been increasingly favored by small and medium-sized teams.

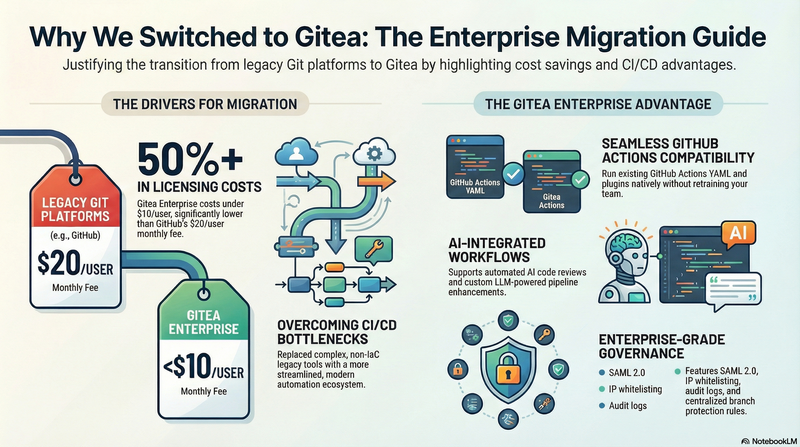
The main purpose of this article is to share why our team ultimately decided to migrate from Bitbucket Data Center to Gitea—and why we didn’t choose a more feature-rich but comparatively heavier open-source solution like GitLab.

[Read More]

為什麼團隊從 Bitbucket Data Center 版本轉向 Gitea 企業版

cover

相信在軟體開發領域,大家對 Git 應該都不陌生——這套全球最受歡迎的版本控制系統已成為現代協作開發的基礎工具。而提到 Git,就不得不想到目前全球最大且最知名的開源軟體平台 GitHub

但在許多私人企業或中小型團隊中,如果因為安全性、成本、部署策略或法規需求等原因,而不能直接採用 GitHub,那麼有哪些工具可以作為企業內部的 Git 版本庫平台呢?最常見的選擇包含 GitLab 以及本篇將深入探討的 Gitea

對部分團隊而言,Gitea 可能還相對陌生。簡單來說,Gitea 是一套以 Go 語言打造的極輕量、自架型 Git 平台,提供與 GitHub 類似的功能,例如程式碼託管、權限管理、Issue 與 Pull Request、CI/CD 等能力。 你也可以在官方文件中看到更完整說明(Gitea Documentation)。它跨平台、容易部署,且維護成本低,因此逐漸受到中小型團隊青睞。

本篇文章的主軸,就是要和大家分享: 為什麼我們團隊最終選擇從 Bitbucket Data Center 遷移到 Gitea?又為什麼沒有選擇 GitLab 這類功能更完整、但相對較為沉重的開源方案?

[Read More]

Building AI-Powered GitHub Workflows: A Complete Guide to LLM Action

blog cover

In the AI era, integrating Large Language Models into CI/CD pipelines has become crucial for improving development efficiency. However, existing solutions are often tied to specific service providers, and LLM outputs are typically unstructured free-form text that is difficult to parse and use reliably in automated workflows. LLM Action was created to solve these pain points.

The core feature is support for Tool Schema structured output—you can predefine a JSON Schema to force LLM responses to conform to a specified format. This means AI no longer just returns a block of text, but produces predictable, parseable structured data. Each field is automatically converted into GitHub Actions output variables, allowing subsequent steps to use them directly without additional string parsing or regex processing. This completely solves the problem of unstable LLM output that is difficult to integrate into automated workflows.

Additionally, LLM Action provides a unified interface to connect to any OpenAI-compatible service, whether it’s cloud-based OpenAI, Azure OpenAI, or locally deployed self-hosted solutions like Ollama, LocalAI, LM Studio, or vLLM—all can be seamlessly switched.

Practical use cases include:

  • Automated Code Review: Define a Schema to output fields like score, issues, suggestions, directly used to determine whether the review passes
  • PR Summary Generation: Structured output of title, summary, breaking_changes for automatic PR description updates
  • Issue Classification: Output category, priority, labels to automatically tag Issues
  • Release Notes: Generate arrays of features, bugfixes, breaking to automatically compose formatted release notes
  • Multi-language Translation: Batch output multiple language fields, completing multi-language translation in a single API call

Through Schema definition, LLM Action transforms AI output from “unpredictable text” to “programmable data,” truly enabling end-to-end AI automated workflows.

[Read More]

打造 AI 驅動的 GitHub 工作流程:LLM Action 完整指南

blog cover

在 AI 時代,將大型語言模型整合進 CI/CD 流程已成為提升開發效率的關鍵。然而,現有的解決方案往往綁定特定服務商,且 LLM 的輸出通常是非結構化的自由文字,難以在自動化流程中可靠地解析與使用。LLM Action 的誕生正是為了解決這些痛點。

最核心的特色是支援 Tool Schema 結構化輸出——你可以預先定義 JSON Schema,讓 LLM 的回應強制符合指定格式。這意味著 AI 不再只是回傳一段文字,而是產出可預測、可解析的結構化資料,每個欄位都會自動轉換為 GitHub Actions 的輸出變數,讓後續步驟能直接取用,無需額外的字串解析或正則表達式處理。這徹底解決了 LLM 輸出不穩定、難以整合進自動化流程的問題。

此外,LLM Action 提供統一介面串接任何 OpenAI 相容的服務,無論是雲端的 OpenAI、Azure OpenAI,還是本地部署的 Ollama、LocalAI、LM Studio、vLLM 等自託管方案,都能無縫切換。

實際應用場景包括:

  • 自動化 Code Review:定義 Schema 輸出 scoreissuessuggestions 等欄位,直接用於判斷是否通過審查
  • PR 摘要生成:結構化輸出 titlesummarybreaking_changes 供後續自動更新 PR 描述
  • Issue 分類:輸出 categoryprioritylabels 自動為 Issue 加上標籤
  • Release Notes:產出 featuresbugfixesbreaking 陣列,自動組成格式化的發布說明
  • 多語言翻譯:批次輸出多個語言欄位,一次 API 呼叫完成多語系翻譯

透過 Schema 定義,LLM Action 讓 AI 輸出從「不可預測的文字」變成「可程式化的資料」,真正實現端到端的 AI 自動化工作流程。

[Read More]

初探輕量級 DevOps 平台: Gitea - 台北 DevOpsDay

logo

今年非常幸運可以在台北 DevOpsDay 給一場『輕量級 DevOps 平台: Gitea Platform』,這次分享主要是介紹輕量級 DevOps 平台,並且改善開發流程,讓開發者可以更快速的部署到生產環境。如果你使用過 GitHub Actions,那 Gitea DevOps 平台你一定不要錯過。Gitea 團隊在 2022 年底開始打造讓 Gitea 可以像是 GitHub 一樣使用 GitHub Actions,詳細的內容可以參考這篇文章。底下讓我們來看看怎麼使用 Gitea DevOps 平台。

[Read More]

infrastructure as code 優勢及工具選擇

logo

今年在 Cloud Summit 會議上分享『初探 Infrastructure as Code 工具 Pulumi』,主要幾項重點跟大家分享

  1. 什麼是 infrastructure as code 簡稱 IaC
  2. IaC 對團隊帶來什麼優勢
  3. PulumiTerraform 兩大工具比較
  4. Pulumi 價格比較

IaC 帶來的好處跟優勢如下

  1. 建置 CI/CD 自動化 (不用依賴 UI 操作)
  2. 版本控制 (審核避免錯誤)
  3. 重複使用 (減少建置時間)
  4. 環境一至性 (測試及正式)
  5. 團隊成長 (分享學習資源)

內容會偏向介紹 Pulumi 工具居多,如果想多了解,參考本投影片準沒錯

[Read More]

兩台電腦透過 croc 工具來傳送檔案 (簡單, 加密, 快速)

croc

兩台電腦之間該如何傳送檔案,其實方法有超多種的,像是 FTP 或透過 SSH 方式來傳送檔案,但是這些方法步驟都有點複雜,FTP 需要架設 FTP 服務,SSH 要學習 SCP 指令,那有沒有更好的方式從單一電腦點對點傳送檔案到另一台呢?傳送過程需要快速又要安全,本篇介紹一套用 Go 語言寫的工具叫 croc,詳細的介紹可以參考看看作者的 Blog 介紹,此工具有底下功能及優勢。

[Read More]

搶救 Terraform State 檔案

recovery the terraform state file

近期其中一個專案使用 Terraform 來管理 AWS 雲平台,初期預計只有我一個人在使用 Terraform,所以就沒有將 Backend State 放在 AWS S3 進行備份管理,這個粗心大意讓我花了大半時間來搶救 State (.tfstate) 檔案,而搶救過程也是蠻順利的,只是需要花時間用 terraform import 指令將所有的 State 狀態全部轉回來一次,當然不是每個 Resource 都可以正常運作,還是需要搭配一些修正才能全部轉換。

結論: 請使用 terraform import 指令,這是最終解法。

[Read More]

初探 Pulumi 上傳靜態網站到 AWS S3 (二)

cover

上一篇『初探 Pulumi 上傳靜態網站到 AWS S3 (一)』主要介紹 Pulumi 基本使用方式,而本篇會延續上一篇教學把剩下的章節教完,底下是本篇會涵蓋的章節內容:

  1. 設定 Pulumi Stack 環境變數
  2. 建立第二個 Pulumi Stack 環境
  3. 刪除 Pulumi Stack 環境

讓開發者可以自由新增各種不同環境,像是 Testing 或 Develop 環境,以及該如何動態帶入不同環境的變數內容,最後可以透過單一指令將全部資源刪除。

[Read More]

初探 Pulumi 上傳靜態網站到 AWS S3 (一)

cover

上一篇作者提到了兩套 Infrastructure as Code 工具,分別是 TerraformPulumi,大家對於前者可能會是比較熟悉,那本篇用一個實際案例『建立 AWS S3 並上傳靜態網站』來跟大家分享如何從無開始一步一步使用 Pulumi。本教學使用的程式碼都可以在 GitHub 上面瀏覽及下載。教學會拆成七個章節:

  1. 建立 Pulumi 新專案
  2. 設定 AWS 環境
  3. 初始化 Pulumi 架構 (建立 S3 Bucket)
  4. 更新 AWS 架構 (S3 Hosting)
  5. 設定 Pulumi Stack 環境變數 (教學二)
  6. 建立第二個 Pulumi Stack 環境 (教學二)
  7. 刪除 Pulumi Stack 環境 (教學二)
[Read More]