MCP Officially Says Goodbye to DCR: Hands-On CIMD with Signet — an HTTPS URL Is Your client_id

cover

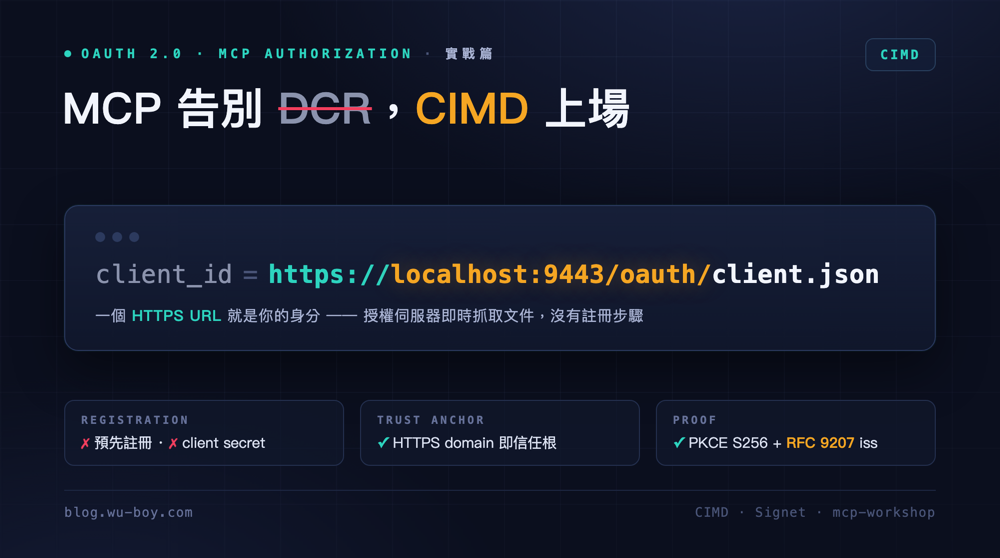
In the 2026-07-28 Authorization spec announcement, MCP shipped a batch of authorization-hardening changes in one go: RFC 9207 issuer validation is now mandatory, client credentials are bound to the issuer that minted them (no reuse across authorization servers), and — the headline item — Dynamic Client Registration (DCR) is formally deprecated in favor of CIMD (Client ID Metadata Documents). DCR stays functional for backward compatibility for at least 12 months, but the direction is set: a future version will remove it.

Half a year ago I wrote Introduction to OAuth Client ID Metadata Document (CIMD), covering the three pain points CIMD solves (pre-registration doesn’t scale, DCR’s unbounded client database and self-asserted trust problem, and MCP’s “no pre-existing relationship” scenario). That was the concept piece; now that the spec has put CIMD front and center, it’s time for the hands-on companion — running a complete CIMD authorization flow end to end, watching an HTTPS URL travel all the way into the client_id claim of an access token.

This post takes apart the 03-oauth-mcp/cimd sample from go-training/mcp-workshop: two runnable Go programs (cimd-client, cimd-server) with Signet as the authorization server — from minting a local certificate with mkcert, publishing the client metadata document, Authorization Code + PKCE, RFC 9207 iss validation, to finally calling the MCP who_am_i tool with a Bearer token. And as a bonus: swapping the OAuth client for Claude Code itself, logging in against the CIMD URL with claude mcp add.

[Read More]

MCP 正式告別 DCR:用 Signet 實戰 CIMD,一個 HTTPS URL 就是你的 client_id

cover

MCP 官方在 2026-07-28 版的 Authorization 規範公告中,一口氣做了幾件授權強化(authorization hardening)的大事:RFC 9207 issuer 驗證成為必須、client 憑證綁定發行它的 issuer 不得跨 AS 重用,以及最重要的一項——Dynamic Client Registration(DCR)正式棄用(deprecated),由 CIMD(Client ID Metadata Documents)接手成為標準做法。DCR 還會為了向下相容保留至少 12 個月,但方向已經定了:未來版本會把它移除。

半年前我寫過一篇 《OAuth Client ID Metadata Document (CIMD) 簡介》,把 CIMD 要解決的三個痛點(預先註冊不可行、DCR 的無界資料庫與自我宣告信任問題、MCP「毫無前置關係」的場景)講完了。那是概念篇;現在官方直接把 CIMD 推上正桌,是時候補上實戰篇——親手把一條完整的 CIMD 授權流程跑起來,看著一個 HTTPS URL 一路變成 access token 裡的 client_id

這篇拆解的是 go-training/mcp-workshop 的 03-oauth-mcp/cimd 範例:兩個能跑的 Go 程式(cimd-clientcimd-server)搭配 Signet 當授權伺服器,從 mkcert 簽本機憑證、發佈 client metadata document、Authorization Code + PKCE、RFC 9207 iss 驗證,到最後帶著 Bearer token 呼叫 MCP 的 who_am_i 工具。最後再加碼:把 OAuth client 換成 Claude Code 本人,用 claude mcp add 直接對著 CIMD URL 登入。

[Read More]

Taking the MCP Mix-Up Attack Apart: A Runnable Walkthrough of the RFC 9207 Defense

cover

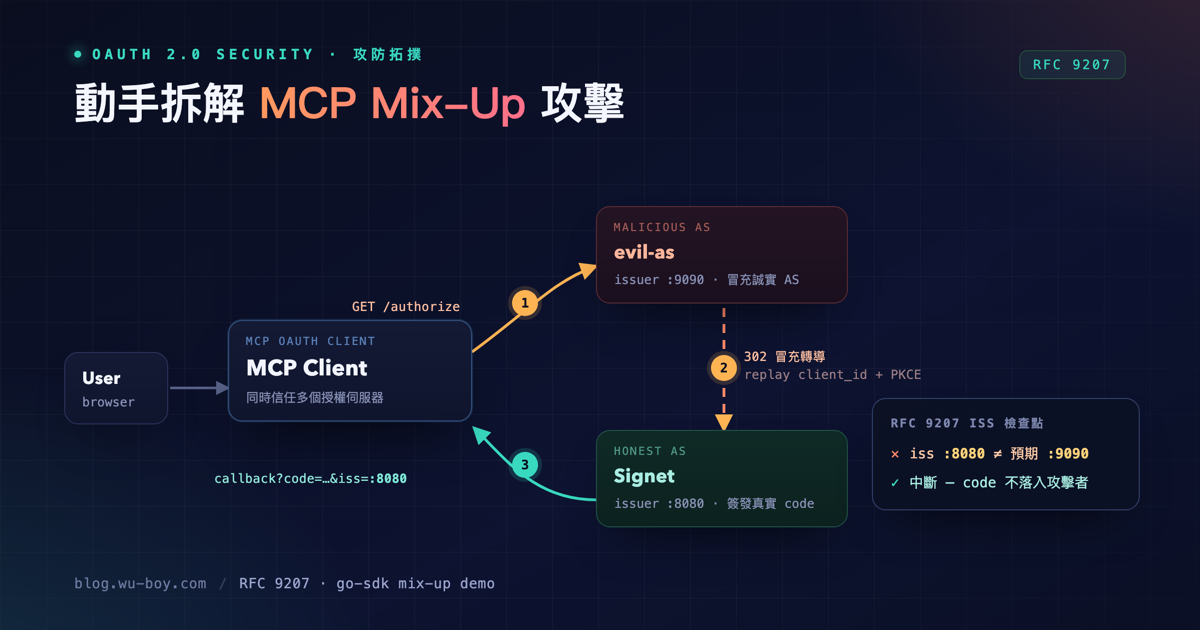
The previous post, When an MCP Client Trusts Multiple Authorization Servers: Stopping Mix-Up Attacks with RFC 9207, laid out the theory thoroughly: how the authorization-server mix-up attack works, why neither state nor PKCE stops it, and why RFC 9207’s iss parameter is the missing piece. But understanding the concept is one thing. Watching a valid authorization code get stolen and minted into a real access token is another thing entirely.

This is the hands-on companion. I take the 03-oauth-mcp/issuer-identification sample from go-training/mcp-workshop apart piece by piece: a malicious authorization server (evil-as), an MCP client that hand-rolls its OAuth flow, and an honest MCP resource server — three real Go programs you can actually run. You’ll trigger the attack yourself and watch the attacker’s terminal print STOLEN ACCESS TOKEN; then add one -defense flag and watch the same attack get cut off — by an iss comparison — before it does any harm.

[Read More]

動手拆解 MCP Mix-Up 攻擊:用一份可執行範例看懂 RFC 9207 怎麼防

cover

前一篇 《當 MCP Client 同時信任多個授權伺服器:用 RFC 9207 堵住 Mix-Up 攻擊》把「授權伺服器 Mix-Up 攻擊」的原理、為什麼 state 和 PKCE 都擋不住它、以及 RFC 9207iss 參數為什麼是那塊缺角,講得很完整。但概念看懂是一回事,親眼看到一顆合法的 authorization code 被攻擊者攔走、換成一顆真的 access token,又是另一回事。

這篇是它的實戰版。我把 go-training/mcp-workshop 的 03-oauth-mcp/issuer-identification 範例整套拆開來講:一個惡意授權伺服器(evil-as)、一個手工實作 OAuth 流程的 MCP client、一個誠實的 MCP resource server,三個真的能跑起來的 Go 程式。你可以親手把攻擊跑一遍,看著攻擊者的終端機印出 STOLEN ACCESS TOKEN;再加一個 -defense 旗標,看著同一個攻擊在造成損害前被 iss 比對擋下來。

[Read More]

When an MCP Client Trusts Multiple Authorization Servers: Stopping Mix-Up Attacks with RFC 9207

cover

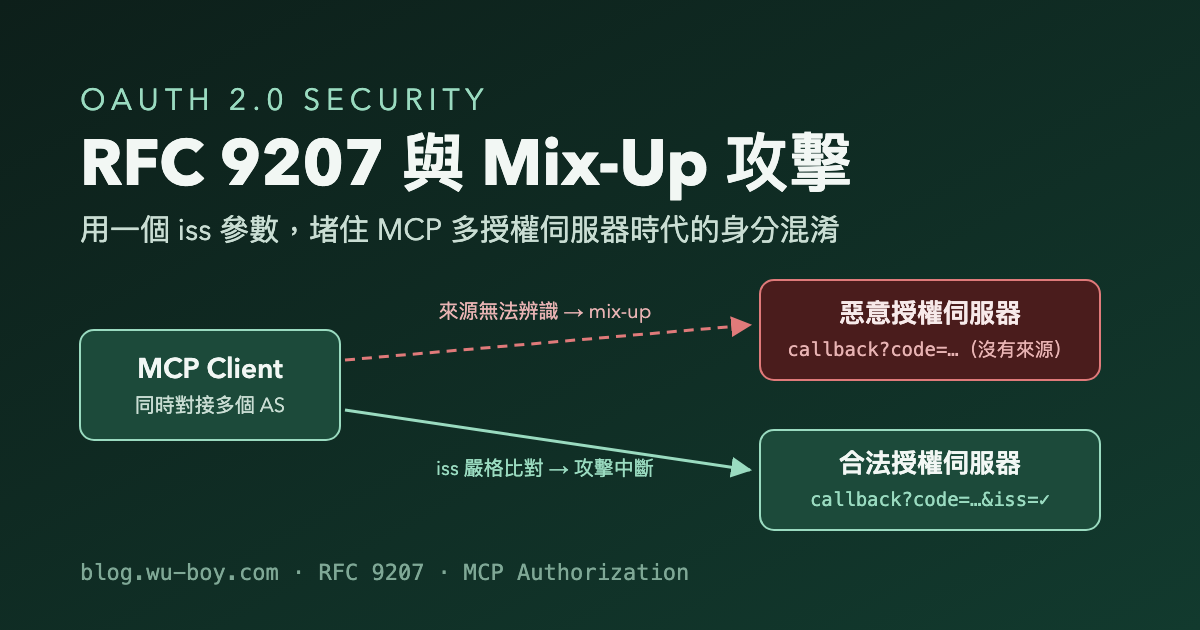
The MCP (Model Context Protocol) Authorization spec rides on standard OAuth 2.1: the MCP Server is the Resource Server, the MCP Client is the OAuth Client, and behind them sits one or more Authorization Servers (AS). The most elegant — and most easily overlooked — property of this design is that a single MCP Client can talk to multiple authorization servers at once. The spec says it in black and white: the authorization_servers field of the Protected Resource Metadata “can define multiple authorization servers,” and “the responsibility for selecting which authorization server to use lies with the MCP client.”

Once “one client, many ASes” becomes the norm, an attack that barely exists in the single-AS world surfaces: the authorization server mix-up attack. This post walks through how the attack works, why the IETF wrote a dedicated RFC — RFC 9207 — just for it, and how to implement it in an OAuth 2.0 authorization server (including an issuer-inconsistency bug the implementation surfaced).

[Read More]

當 MCP Client 同時信任多個授權伺服器:用 RFC 9207 堵住 Mix-Up 攻擊

cover

MCP(Model Context Protocol)Authorization 規範 走的是標準 OAuth 2.1 那一套:MCP Server 當 Resource Server、MCP Client 當 OAuth Client、背後再接一個或多個 Authorization Server(以下簡稱 AS)。這套設計最漂亮、也最容易被忽略的一個特性是——同一個 MCP Client 可以同時對接多個授權伺服器。MCP 規範裡白紙黑字寫著:Protected Resource Metadata 的 authorization_servers 欄位「可以定義多個授權伺服器,由 MCP Client 自己決定要用哪一個」。

一旦「一個 client、多個 AS」成為常態,一種在單一 AS 世界裡幾乎不存在的攻擊就浮上檯面了:授權伺服器 Mix-Up 攻擊(AS mix-up attack)。這篇文章要談的,就是這個攻擊怎麼運作、為什麼 IETF 要為它單獨立一份 RFC 9207,以及在一台 OAuth 2.0 授權伺服器上要怎麼把它實作起來(附上我實作時踩到的一個 issuer 不一致 bug)。

[Read More]

From Watching on the Sidelines to Company-Wide Adoption: Two Years of AI Agentic Coding in Practice

cover

Date: 2026.07.01 Event: 2026 Cloud Summit Taiwan Speaker: appleboy

This time last year, the question we were asking was “how can AI help us improve our productivity?” This year, the question has flipped: “how can we help AI so that it accelerates our work?” Swapping the subject and the object sounds like wordplay, but it is exactly the most fundamental mindset shift we went through over these two years of rolling out AI Agentic Coding across the company.

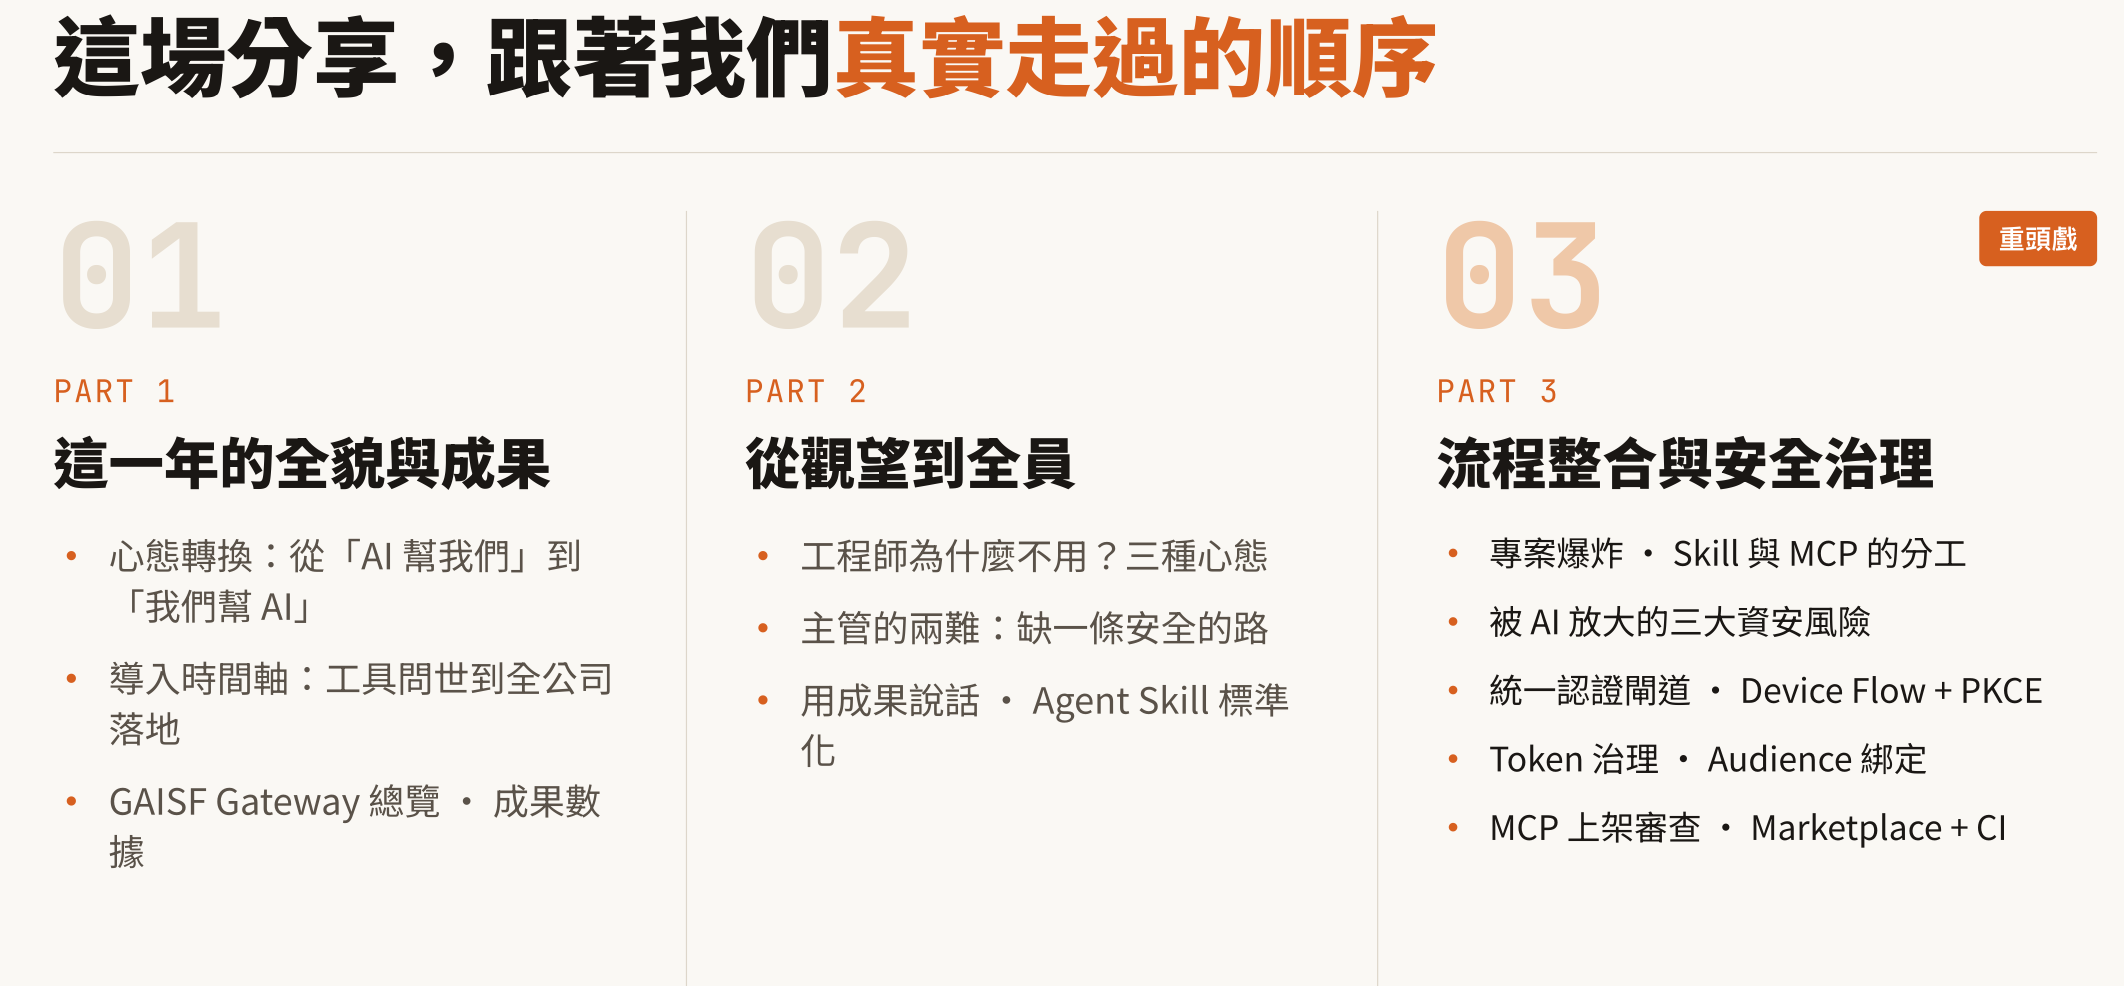
This article documents a road we actually traveled: from a handful of people quietly trying out Claude Code, to everyone in the company using it daily; from AI producing 66% of our output, all the way up to 97%; from engineers’ three wait-and-see attitudes — “I don’t trust it, I’m afraid of being replaced, I’m worried about security” — to letting results speak for themselves and packaging individual tricks into standardized Agent Skills; from every team writing its own MCP Server and triggering a project explosion, to pulling the security governance of the whole ecosystem back together with a unified authentication gateway and a Marketplace review process.

Three parts, in the order we actually lived through them: the full picture and the results of this year → from the sidelines to everyone on board → workflow integration and security governance.

[Read More]

從觀望到全公司落地:兩年 AI Agentic Coding 導入實戰

cover

日期:2026.07.01 活動:2026 Cloud Summit 台灣雲端大會 講者:appleboy

去年這個時候,我們在想的是「AI 怎麼協助我們改善工作效率」;今年,問題反過來了——「我們該怎麼協助 AI,讓它加速我們的工作」。主詞和受詞對調,聽起來像文字遊戲,但這正是這兩年公司內部 AI Agentic Coding 導入路上,最核心的一次心態轉變。

這篇文章記錄的是一段真實走過的路:從少數人偷偷試用 Claude Code,到全公司日常使用;從 AI 產出佔比 66%,一路衝到 97%;從工程師「不信任、怕被取代、擔心資安」的三種觀望心態,到用成果說話、把個人技巧封裝成標準化的 Agent Skill;從每個團隊各自寫 MCP Server 導致的專案爆炸,到用統一認證閘道與 Marketplace 審查機制把整個生態圈的資安治理收攏起來。

三個部分,跟著我們真實走過的順序:這一年的全貌與成果 → 從觀望到全員 → 流程整合與安全治理

[Read More]

Stop Letting Every MCP Server Collect Its Own PAT: A Unified OAuth2 Front Door with Kong + Signet

cover

Once MCP (Model Context Protocol) exploded inside the company, almost every team ended up running an MCP server or two of their own: one fronting Gitea, one for Sentry, one for the internal Wiki, one for a database. They’re genuinely useful — but there’s a question everyone collectively ignored: how do these MCP servers actually authenticate?

The answer is usually unsettling: each one collects its own PAT (Personal Access Token). Every MCP server defines its own token, stuffs it into an environment variable, and validates it itself. So the company quietly accumulates a pile of static tokens — “long-lived, sitting in a file, equivalent to someone’s account” — scattered across dev machines, CI, even pasted into Slack messages. This post is about using Kong together with Signet to put a single OAuth2 front door in front of every MCP server and clean up that PAT sprawl in one move.

The full example code lives in appleboy/kong-mcp-oauth2. This post walks through the motivation, the architecture, the security considerations, and the actual verification steps.

[Read More]

別再讓 MCP Server 各自收 PAT:用 Kong + Signet 做企業統一 OAuth2 入口

cover

MCP(Model Context Protocol) 在公司內部爆量之後,幾乎每個團隊都自己跑了一兩個 MCP Server:接 Gitea 的、接 Sentry 的、接內部 Wiki 的、接資料庫的。它們很好用,但有一個被集體忽略的問題——這些 MCP Server 到底是怎麼認證的?

答案多半令人不安:各自收各自的 PAT(Personal Access Token)。每個 MCP Server 自己定義一套 token、自己塞進環境變數、自己驗。於是公司內部出現了一堆「長期有效、放在檔案裡、等同某個帳號權限」的靜態 token,散落在開發機、CI、甚至貼在 Slack 訊息裡。這篇文章要談的,就是怎麼用 Kong 搭配 Signet,在所有 MCP Server 前面架起單一的 OAuth2 入口,把這堆 PAT 一次收掉。

完整的範例程式碼在 appleboy/kong-mcp-oauth2,本文會帶你走過設計動機、架構、安全考量到實際驗證。

[Read More]